wepy-CLI
安装
npm install -g wepy-cli
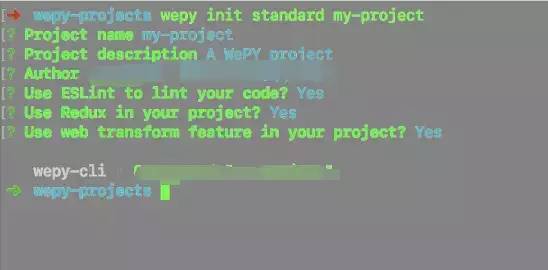
wepy init standard my-project
https://github.com/Tencent/wepy
特性:
-
类Vue开发风格
-
支持自定义组件开发
-
支持引入NPM包
-
支持Promise
-
支持ES2015+特性,如Async Functions
-
支持多种编译器,Less/Sass/Stylus/PostCSS、Babel/Typescript、Pug
-
支持多种插件处理,文件压缩,图片压缩,内容替换等
-
支持 Sourcemap,ESLint等
-
小程序细节优化,如请求列队,事件优化等
Demo
<style lang="less">
    @color: #4D926F;
    .num {
        color: @color;
    }
</style>
<template>
<div class="container">
<div class="num" @tap="num++">
      {{num}}
</div>
<div>{{text}}</div>
<input v-model="text"></input>
</div>
</template>
<config>
{
  usingComponents: {
    customCompoent: '@/components/customComponent',
    vendorComponent: 'module:vendorComponent'
  }
}
</config>

<script>
import wepy from '@wepy/core';

  wepy.page({
data: {
num: 0,
text: 'Hello World',
    },
  });
</script>
npm install @wepy/cli@next -g

wepy init standard myproject

cd myproject
npm install

wepy build --watch
Usage: init <template-name> [project-name]

  generate a new project from a template


  Options:

    -c --clone  use git clone
    --offline   use cached template
    -h, --help  output usage information

  Example:

# create a new project with an official template
  $ wepy init standard my-project

# create a new project straight from a github template
  $ wepy init username/repo my-project

image.png
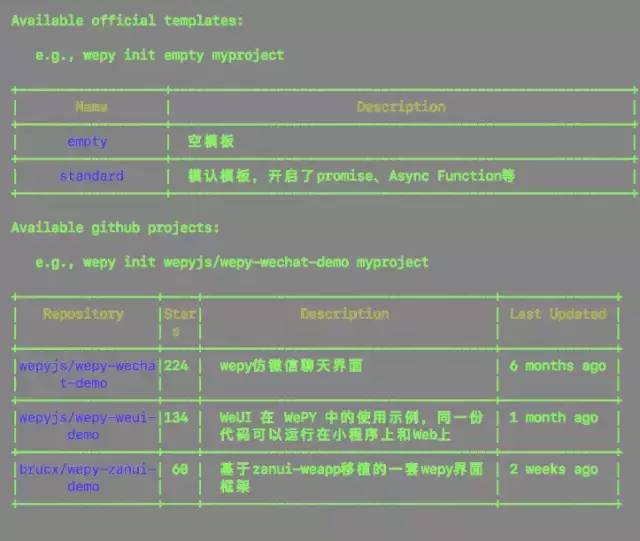
查看官方、第三方模板资源
Usage: list [options]

list available official templates


  Options:

    -g, --github  list all registered github projects
    -h, --help    output usage information

image.png
Usage: build [options]

  build your project


  Options:

    -f, --file <file>      待编译wpy文件
    -s, --source <source>  源码目录
    -t, --target <target>  生成代码目录
    -o, --output <type>    编译类型:web,weapp。默认为weapp
    -p, --platform <type>  编译平台:browser, wechat,qq。默认为browser
    -w, --watch            监听文件改动
    --no-cache             对于引用到的文件,即使无改动也会再次编译
    -h, --help             output usage information
升级wepy-cli
Usage: upgrade [options]

  upgrade to the latest version


  Options:

    --cli   upgrade wepy-cli
    --wepy  upgrade wepy
    -h, --help  output usage information
切换至项目目录
cd myproject
安装依赖
npm install
开启实时编译
wepy build --watch
├── dist                   小程序运行代码目录(该目录由WePY的build指令自动编译生成,请不要直接修改该目录下的文件)
├── node_modules
├── src                    代码编写的目录(该目录为使用WePY后的开发目录)
|   ├── components         WePY组件目录(组件不属于完整页面,仅供完整页面或其他组件引用)
|   |   ├── com_a.wpy      可复用的WePY组件a
|   |   └── com_b.wpy      可复用的WePY组件b
|   ├── pages              WePY页面目录(属于完整页面)
|   |   ├── index.wpy      index页面(经build后,会在dist目录下的pages目录生成index.js、index.json、index.wxml和index.wxss文件)
|   |   └── other.wpy      other页面(经build后,会在dist目录下的pages目录生成other.js、other.json、other.wxml和other.wxss文件)
|   └── app.wpy            小程序配置项(全局数据、样式、声明钩子等;经build后,会在dist目录下生成app.js、app.json和app.wxss文件)
└── package.json           项目的package配置
版本init新生成的代码包会在根目录包含project.config.json文件
如果存在,使用微信开发者工具-->添加项目,项目目录请选择项目根目录即可根据配置完成项目信息自动配置。
如果不存在,建议手动创建该文件后再添加项目。project.config.json文件内容如下:
{
"description": "project description",
"setting": {
"urlCheck": true,
"es6": false,
"postcss": false,
"minified": false
  },
"compileType": "miniprogram",
"appid": "touristappid",
"projectname": "Project name",
"miniprogramRoot": "./dist"
}
es6: 对应关闭ES6转ES5选项,关闭。重要:未关闭会运行报错。
postcss: 对应关闭上传代码时样式自动补全选项,关闭。重要:某些情况下漏掉此项也会运行报错。
minified: 对应关闭代码压缩上传选项,关闭。重要:开启后,会导致真机computed, props.sync 等等属性失效。(注:压缩功能可使用WePY提供的build指令代替,详见后文相关介绍以及Demo项目根目录中的wepy.config.js和package.json文件。)
urlCheck: 对应不检查安全域名选项,开启。如果已配置好安全域名则建议关闭。
原生代码:
//index.js

//获取应用实例
var app = getApp()

//通过Page构造函数创建页面逻辑
Page({
//可用于页面模板绑定的数据
    data: {
motto: 'Hello World',
userInfo: {}
    },

//事件处理函数
    bindViewTap: function() {
console.log('button clicked')
    },

//页面的生命周期函数
    onLoad: function () {
console.log('onLoad')
    }
})
基于WePY的代码:

//index.wpy中的<script>部分

import wepy from 'wepy';

//通过继承自wepy.page的类创建页面逻辑
export default class Index extends wepy.page {
//可用于页面模板绑定的数据
    data = {
motto: 'Hello World',
userInfo: {}
    };

//事件处理函数(集中保存在methods对象中)
    methods = {
        bindViewTap () {
console.log('button clicked');
        }
    };

//页面的生命周期函数
    onLoad() {
console.log('onLoad');
    };
}
若本号内容有做得不到位的地方(比如:涉及版权或其他问题),请及时联系我们进行整改即可,会在第一时间进行处理。

本文摘自 :https://blog.51cto.com/u

