文章目录
一、整合版本说明
1. 毕业版本依赖关系(推荐使用)
Spring Cloud Version
| Spring Cloud Alibaba Version
| Spring Boot Version
|
Spring Cloud 2020.0.0
| 2021.1
| 2.4.2
|
Spring Cloud Hoxton.SR9
| 2.2.6.RELEASE
| 2.3.2.RELEASE
|
Spring Cloud Greenwich.SR6
| 2.1.4.RELEASE
| 2.1.13.RELEASE
|
Spring Cloud Hoxton.SR3
| 2.2.1.RELEASE
| 2.2.5.RELEASE
|
Spring Cloud Hoxton.RELEASE
| 2.2.0.RELEASE
| 2.2.X.RELEASE
|
Spring Cloud Greenwich
| 2.1.2.RELEASE
| 2.1.X.RELEASE
|
2. 组件版本关系
Spring Cloud Alibaba Version
| Sentinel Version
| Nacos Version
| RocketMQ Version
| Dubbo Version
| Seata Version
|
2.2.6.RELEASE
| 1.8.1
| 1.4.2
| 4.4.0
| 2.7.8
| 1.3.0
|
2021.1 or 2.2.5.RELEASE or 2.1.4.RELEASE or 2.0.4.RELEASE
| 1.8.0
| 1.4.1
| 4.4.0
| 2.7.8
| 1.3.0
|
2.2.3.RELEASE or 2.1.3.RELEASE or 2.0.3.RELEASE
| 1.8.0
| 1.3.3
| 4.4.0
| 2.7.8
| 1.3.0
|
2.2.1.RELEASE or 2.1.2.RELEASE or 2.0.2.RELEASE
| 1.7.1
| 1.2.1
| 4.4.0
| 2.7.6
| 1.2.0
|
2.2.0.RELEASE
| 1.7.1
| 1.1.4
| 4.4.0
| 2.7.4.1
| 1.0.0
|
3. 演示版本
Spring Cloud Version
| Spring Cloud Alibaba Version
| Spring Boot Version
| Nacos Version
| jdk
|
Spring Cloud Hoxton.SR9
| 2.2.6.RELEASE
| 2.3.2.RELEASE
| 1.4.2
| 1.8.202
|
官网地址:
https://github.com/alibaba/spring-cloud-alibaba/wiki/%E7%89%88%E6%9C%AC%E8%AF%B4%E6%98%8E
二、整合实战
2.1. 聚合模块设计
模块划分
| 微服务划分
| 端口
|
订单模块
| order-serv
| 8000
|
产品模块
| product-serv
| 9000
|
用户模块
| user-serv
| 15000
|
扣库存模块
| stock-serv
| 11000
|
购物车模块
| shopcart-serv
| 12000
|
2.2. 创建聚合parent
创建maven父工程名称为EShopParent
父工程依赖添加
```bash
     <!--服务注册发现-->
        <dependency>
            <groupId>com.alibaba.cloud</groupId>
            <artifactId>spring-cloud-starter-alibaba-nacos-discovery</artifactId>
        </dependency>

    <dependencyManagement>
        <dependencies>
            <!--spring-cloud-alibaba 版本控制-->
            <dependency>
                <groupId>com.alibaba.cloud</groupId>
                <artifactId>spring-cloud-alibaba-dependencies</artifactId>
                <version>2.2.6.RELEASE</version>
                <type>pom</type>
                <scope>import</scope>
            </dependency>
        </dependencies>
    </dependencyManagement>
2.3. 依次创建子项目
依次创建5个子模块
三、子模块配置
3.1. 订单模块
server:
  port: 8000
spring:
  cloud:
    nacos:
      discovery:
        service: order-serv
      server-addr: localhost:8848
启动类
package com.gblfy;

import org.springframework.boot.SpringApplication;
import org.springframework.boot.autoconfigure.SpringBootApplication;
import org.springframework.cloud.client.discovery.EnableDiscoveryClient;
import org.springframework.cloud.client.loadbalancer.LoadBalanced;
import org.springframework.context.annotation.Bean;
import org.springframework.web.client.RestTemplate;

@SpringBootApplication
@EnableDiscoveryClient
public class OrderApplication {

    @Bean
    @LoadBalanced//负载均衡+动态路路由
    public RestTemplate restTemplate() {
        return new RestTemplate();
    }

    public static void main(String[] args) {
        SpringApplication.run(OrderApplication.class);
    }
}
3.2. 产品模块
server:
  port: 9000
spring:
  cloud:
    nacos:
      discovery:
        service: product-serv
      server-addr: localhost:8848
3.3. 用户模块
server:
  port: 15000
spring:
  cloud:
    nacos:
      discovery:
        service: user-serv
      server-addr: localhost:8848
3.4. 扣库存模块
server:
  port: 11000
spring:
  cloud:
    nacos:
      discovery:
        service: stock-serv
      server-addr: localhost:8848
3.5. 购物车模块
server:
  port: 12000
spring:
  cloud:
    nacos:
      discovery:
        service: shop-cart-serv
      server-addr: localhost:8848
四、测试案例
4.1. 订单模块
package com.gblfy.controller;

import org.springframework.beans.factory.annotation.Autowired;
import org.springframework.web.bind.annotation.GetMapping;
import org.springframework.web.bind.annotation.RestController;
import org.springframework.web.client.RestTemplate;

@RestController
public class OrderController {

    @Autowired
    private RestTemplate restTemplate;

    //http://localhost:8000/order/create?productId=11&userId=11222
    @GetMapping("/order/create")
    public String createOrder(Integer productId, Integer userId) {

        // 调用商品服务,通过商品ID获取商品名称
        String productNmae = restTemplate.getForObject("http://product-serv/product/" + productId, String.class);

        // 调用用户服务,通过用户ID获取用户名称
        String userNmae = restTemplate.getForObject("http://user-serv/user/" + userId, String.class);

        // 调用扣库存服务,通过商品ID将已购买的商品从库存中删除
        String result = restTemplate.getForObject("http://stock-serv/stock/reduce/" + productId, String.class);

        // 调用个购物车服务,通过商品ID和用户ID将已购买的商品从购物车中移除
        String shopCartResult = restTemplate.getForObject("http://shop-cart-serv/shopcart/remove?productId=" + productId + "&userId=" + userId, String.class);
        return "[用户]: " + userNmae + " 购买商品 " + productNmae + " " + result + " " + shopCartResult;
    }
}
4.2. 产品模块
package com.gblfy.controller;

import org.springframework.web.bind.annotation.GetMapping;
import org.springframework.web.bind.annotation.PathVariable;
import org.springframework.web.bind.annotation.RestController;

@RestController
public class ProductController {

    //http://localhost:9000/product/" + productId
    @GetMapping("/product/{productId}")
    public String getProductName(@PathVariable Integer productId) {
        return "IPhone 12";
    }
}
4.3. 用户模块
package com.gblfy.controller;

import org.springframework.web.bind.annotation.GetMapping;
import org.springframework.web.bind.annotation.PathVariable;
import org.springframework.web.bind.annotation.RestController;

@RestController
public class UserController {

    @GetMapping("/user/{userId}")
    public String getUserName(@PathVariable Integer userId) {
        return "gblfy专家";
    }
}
4.4. 扣库存模块
package com.gblfy.controller;

import org.springframework.web.bind.annotation.GetMapping;
import org.springframework.web.bind.annotation.PathVariable;
import org.springframework.web.bind.annotation.RestController;

@RestController
public class StockController {

    @GetMapping("/stock/reduce/{productId}")
    public String reduce(@PathVariable Integer productId) {
        System.out.println("减库存一个成功");
        return "减库存一个成功!";
    }
}
4.5. 购物车模块
package com.gblfy.controller;

import org.springframework.web.bind.annotation.GetMapping;
import org.springframework.web.bind.annotation.RestController;

@RestController
public class ShopCartController {


    @GetMapping("/shopcart/remove")
    public String remove(Integer productId, Integer userId) {
        return "移除购物车成功!";
    }
}
五、连通性测试
5.1. 请求地址
http://localhost:9000/order/create?productId=11&userId=11222
5.2. nacos服务端
Nacos 官网:
https://nacos.io/zh-cn/docs/quick-start.html
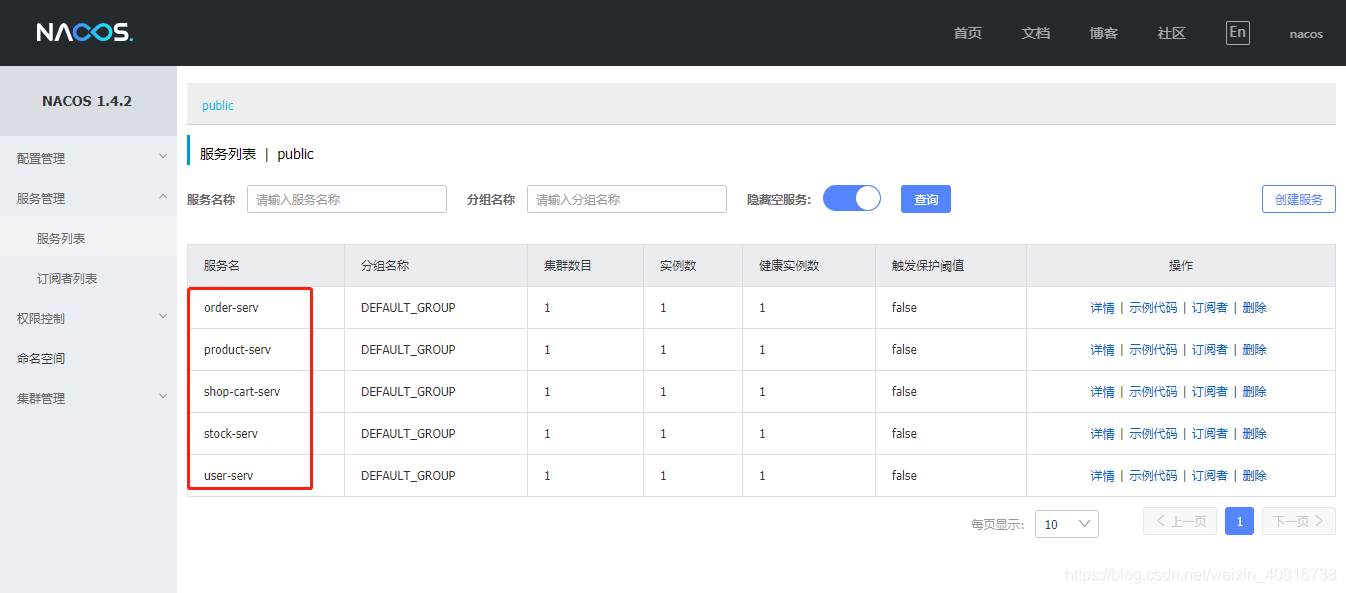
5.3. 效果图
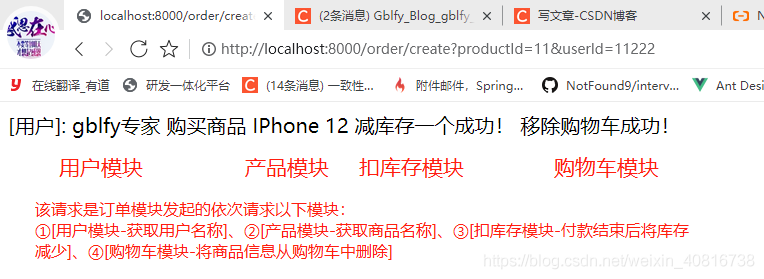
以上5个微服务集成nacos完毕!并测试连通性测试通过!
六、负载均衡测试
6.1. 请求地址
http://localhost:9000/order/create?productId=11&userId=11222
6.2. 测试设计
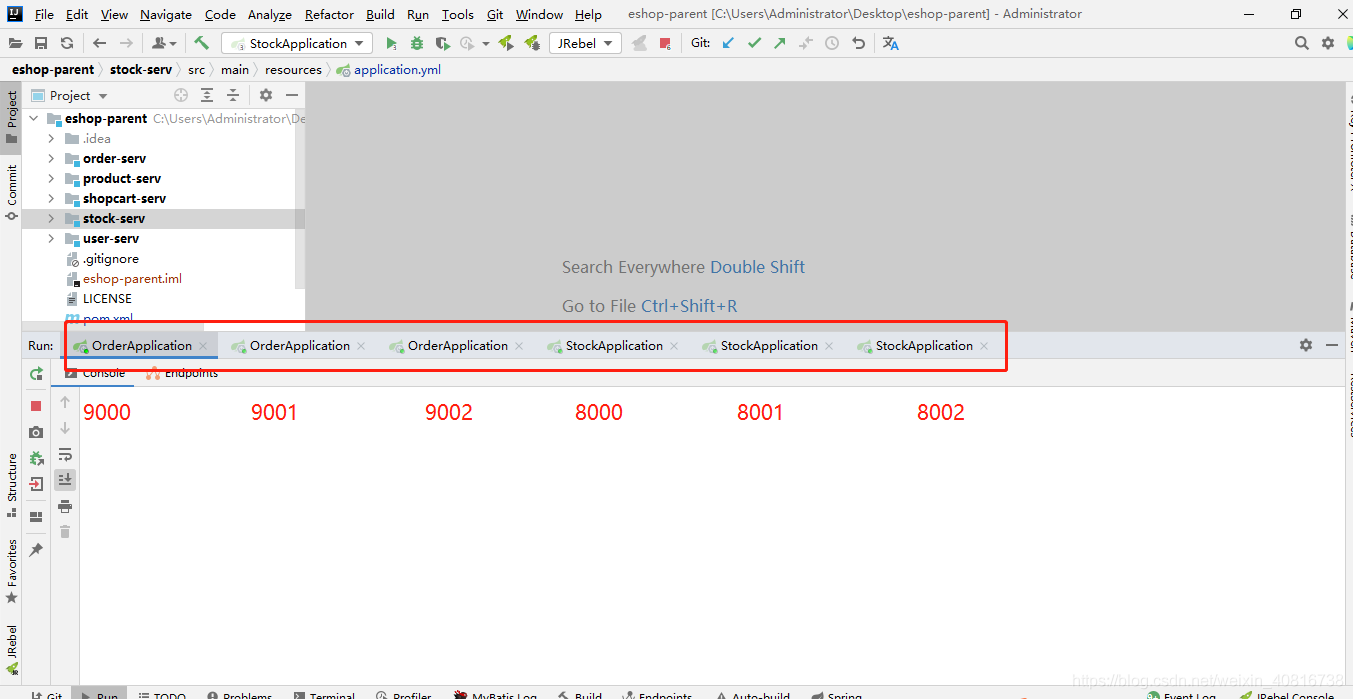
分别启动3个订单模块端口为9000、9001、9002
分别启动3个扣库存模块端口为8000、8001、8002
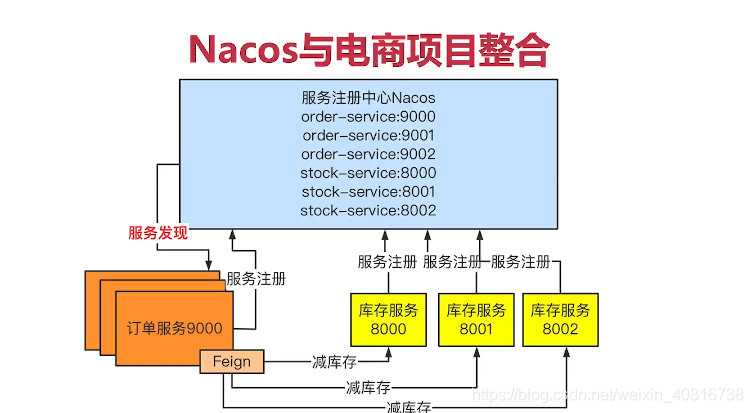
6.3. 登陆nacos
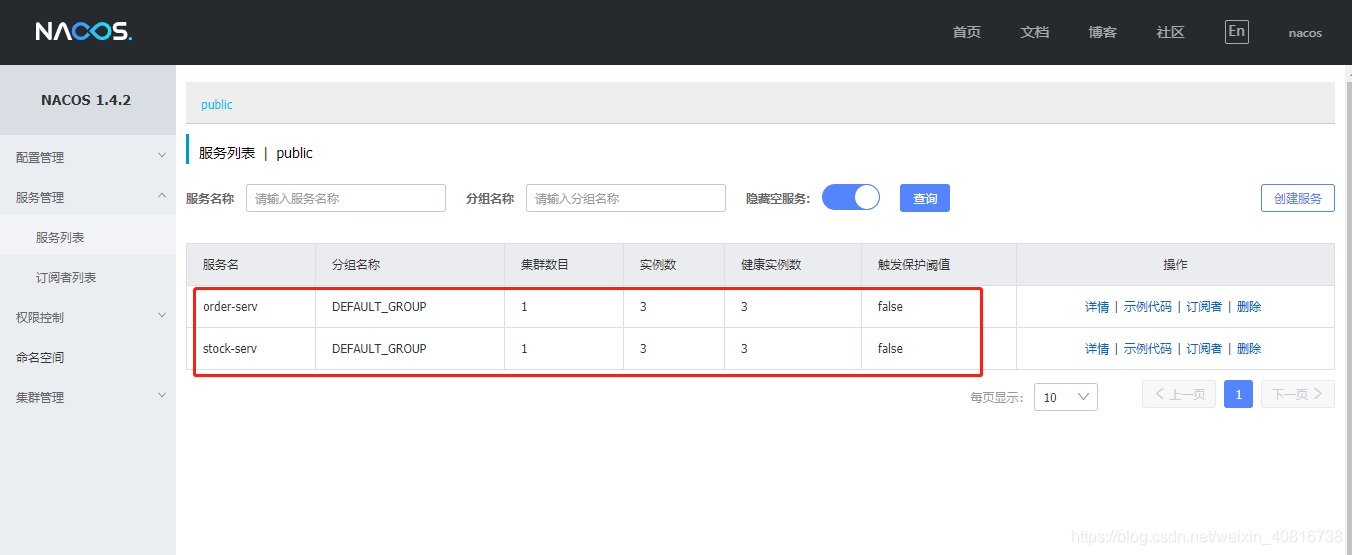
6.4. 连续请求10次,观察命中概率


6.5. nacos 将服务下线

应用不停止
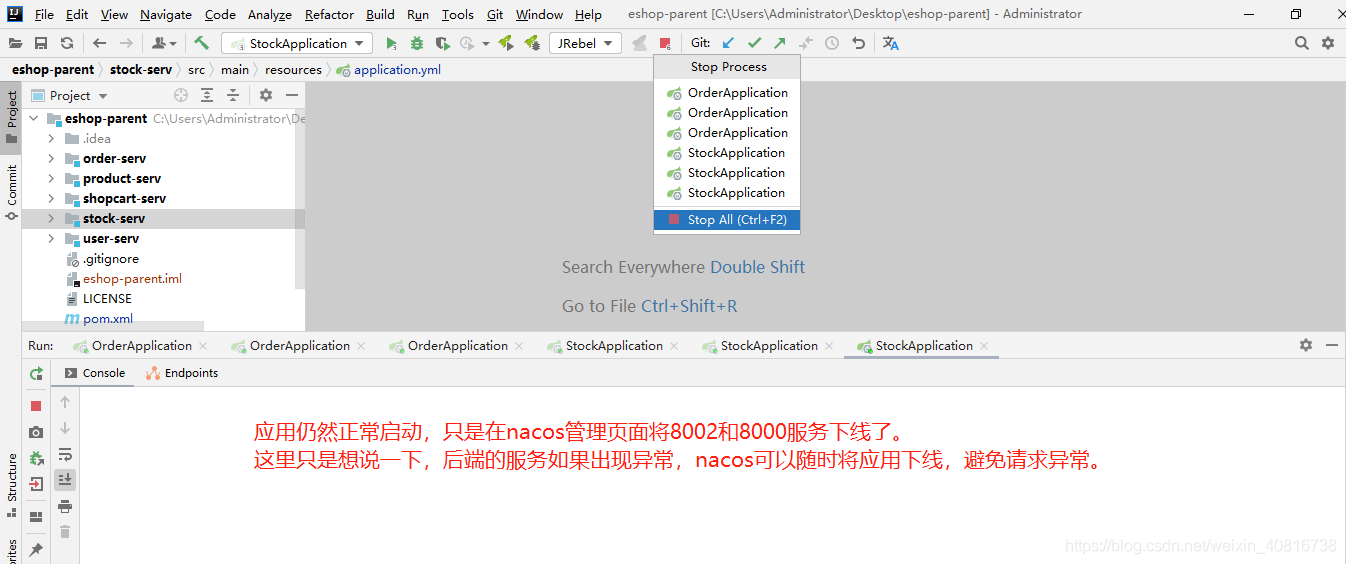
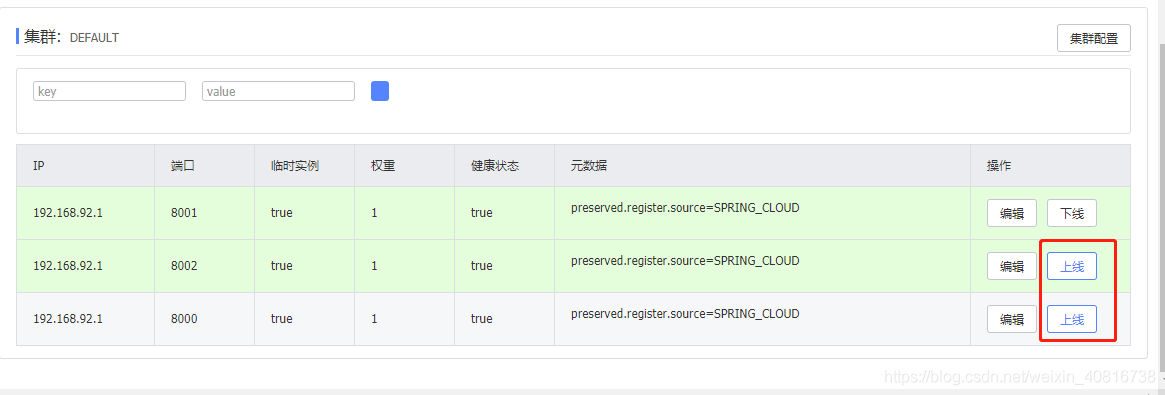
nacos观察服务状态已下线
再次测试
请求地址:
http://localhost:9000/order/create?productId=11&userId=11222

6.6. 重新上线
将下线的项目服务重新上线
负载均衡测试,应该和正常请求一样这里就不演示了。
6.7. 码云开源地址
https://gitee.com/gb_90/eshop-parent


